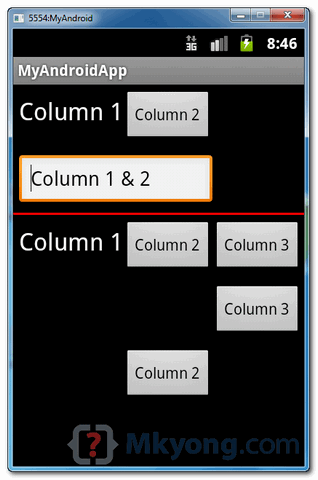
In Android, TableLayout let you arranges components in rows and columns, just like the standard table layout in HTML,
<tr> and <td>.
In this tutorial, we show you how to use
TableLayout to arrange button, textview and edittext in rows and columns format, and also demonstrates the use of “android:layout_span” to span view in 2 cells, and “android:layout_column” to display the view in specified column.
Note
In Eclipse 3.7, XML code assist will not prompts the attribute “
In Eclipse 3.7, XML code assist will not prompts the attribute “
android:layout_span“, “android:layout_column” and many other useful TableLayout attributes, no idea why, may be bug. Just put the attribute inside, it’s still compile and run.
P.S This project is developed in Eclipse 3.7, and tested with Android 2.3.3.
1. TableLayout
Open “res/layout/main.xml” file, add following views for demonstration. Read the XML comments, it should be self-explanatory.
File : res/layout/main.xml
<?xml version="1.0" encoding="utf-8"?> <TableLayout xmlns:android="http://schemas.android.com/apk/res/android" android:id="@+id/tableLayout1" android:layout_width="fill_parent" android:layout_height="fill_parent" > <!-- 2 columns --> <TableRow android:id="@+id/tableRow1" android:layout_width="wrap_content" android:layout_height="wrap_content" android:padding="5dip" > <TextView android:id="@+id/textView1" android:text="Column 1" android:textAppearance="?android:attr/textAppearanceLarge" /> <Button android:id="@+id/button1" android:text="Column 2" /> </TableRow> <!-- edittext span 2 column --> <TableRow android:id="@+id/tableRow2" android:layout_width="wrap_content" android:layout_height="wrap_content" android:padding="5dip" > <EditText android:id="@+id/editText1" android:layout_span="2" android:text="Column 1 & 2" /> </TableRow> <!-- just draw a red line --> <View android:layout_height="2dip" android:background="#FF0000" /> <!-- 3 columns --> <TableRow android:id="@+id/tableRow3" android:layout_width="wrap_content" android:layout_height="wrap_content" android:padding="5dip" > <TextView android:id="@+id/textView2" android:text="Column 1" android:textAppearance="?android:attr/textAppearanceLarge" /> <Button android:id="@+id/button2" android:text="Column 2" /> <Button android:id="@+id/button3" android:text="Column 3" /> </TableRow> <!-- display this button in 3rd column via layout_column(zero based) --> <TableRow android:id="@+id/tableRow4" android:layout_width="wrap_content" android:layout_height="wrap_content" android:padding="5dip" > <Button android:id="@+id/button4" android:layout_column="2" android:text="Column 3" /> </TableRow> <!-- display this button in 2nd column via layout_column(zero based) --> <TableRow android:id="@+id/tableRow5" android:layout_width="wrap_content" android:layout_height="wrap_content" android:padding="5dip" > <Button android:id="@+id/button5" android:layout_column="1" android:text="Column 2" /> </TableRow> </TableLayout>
2. Demo
See result.

Download Source Code
Download it – Android-TableLayout-Example.zip (15 KB)
References
- Android TableLayout example
- Android TableLayout JavaDoc
- Another great Android TableLayout example
- Set layout span through code
Thanks
akm
www.cdacians.com


No comments:
Post a Comment