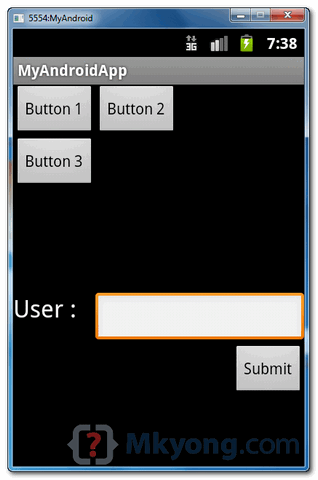
In Android, RelativeLayout let you position your component base on the nearby (relative or sibling) component’s position. It’s the most flexible layout, that allow you to position your component to display in anywhere you want (if you know how to “relative” it).
In
RelativeLayout, you can use “above, below, left and right” to arrange the component position, for example, display a “button1″ below “button2″, or display “button3″ on right of the “button1″.
Note
The
The
RelativeLayout is very flexible, but hard to master it. Suggest you use Eclipse IDE to drag the component, then view study the Eclipse generated XML layout code to understand how to code “relative” components.
In this tutorial, we show you how to arrange / position
button, textview and editbox via “RelativeLayout“.
P.S This project is developed in Eclipse 3.7, and tested with Android 2.3.3.
1. RelativeLayout
Open “res/layout/main.xml” file, add components and position it via “
RelativeLayout“. Read below XML code, quite verbose to tell you where to display the component.
File : res/layout/main.xml
<?xml version="1.0" encoding="utf-8"?>
<RelativeLayout xmlns:android="http://schemas.android.com/apk/res/android"
    android:layout_width="fill_parent"
    android:layout_height="fill_parent" >

    <Button
        android:id="@+id/btnButton1"
        android:layout_width="wrap_content"
        android:layout_height="wrap_content"
        android:text="Button 1"/>

    <Button
        android:id="@+id/btnButton2"
        android:layout_width="wrap_content"
        android:layout_height="wrap_content"
        android:text="Button 2"
        android:layout_toRightOf="@+id/btnButton1"/>

     <Button
        android:id="@+id/btnButton3"
        android:layout_width="wrap_content"
        android:layout_height="wrap_content"
        android:text="Button 3"
        android:layout_below="@+id/btnButton1"/>

     <TextView
         android:id="@+id/textView1"
         android:layout_width="wrap_content"
         android:layout_height="wrap_content"
         android:layout_below="@+id/btnButton3"
         android:layout_marginTop="94dp"
         android:text="User :"
         android:textAppearance="?android:attr/textAppearanceLarge" />

     <EditText
         android:id="@+id/editText1"
         android:layout_width="wrap_content"
         android:layout_height="wrap_content"
         android:layout_alignParentRight="true"
         android:layout_alignTop="@+id/textView1"
         android:layout_toRightOf="@+id/btnButton3" />

     <Button
         android:id="@+id/btnSubmit"
         android:layout_width="wrap_content"
         android:layout_height="wrap_content"
         android:layout_alignParentRight="true"
         android:layout_below="@+id/editText1"
         android:text="Submit" />

</RelativeLayout>
2. Demo
See result, above XML code will generate following output.

Download Source Code
Download it – Android-RelativeLayout-Example.zip (15 KB)
References
Thanks
akm
www.cdacians.com


No comments:
Post a Comment