

Introduction
NOTE #1: This tutorial was written for Android v1.0. I have just updated theAndroid streaming media player tutorial/code to v1.5 (Cupcake) with some additional information on the updated code. You should read that post as well as this one.
NOTE #2: This tutorial is about progressive audio. If you want to stream live media, then please read my post on live and progressive streaming with Android.
This is a long tutorial, but for those of you that have been struggling with streaming of .mp3 audio to Google’s Android’s MediaPlayer, then I hope this tutorial proves useful as you finalize your entries into Google’s Android Challenge
This tutorial will show how to roll your own streaming audio utility for Android’s MediaPlayer. We will buffer 10 seconds of audio and start playing that audio while the rest of the audio loads in the background. We store the streamed audio locally so you could cache it on device for later use or simply let it be garbage collected.
Here’s the source code for those that just want to jump in. You’ll also notice code for the other tutorials as I didn’t have time to strip them out.
Here are a few screenshots of what we’ll be creating:
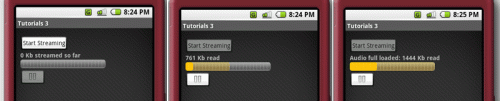
Basic Layout
The tutorial consists of just two classes:
Tutorial3: Contains the UI layout and process button clicks
StreamingMediaPlayer: Connects to the server, downloads audio into the buffer, and controls the functionality to ensure the audio continues to play seamlessly.
StreamingMediaPlayer: Connects to the server, downloads audio into the buffer, and controls the functionality to ensure the audio continues to play seamlessly.
We’ll assume you know about UI layout using Android’s XML resource files and will instead jump right into the audio streaming code.
Start Your Streaming
Upon clicking the “Start Streaming” button, Tutorial3 creates an instance of StreamingMediaPlayer.
new StreamingMediaPlayer(textStreamed, playButton, streamButton,progressBar);
All UI elements are passed to StreamingMediaPlayer so it can perform UI update itself. In a more robust implementation, StreamingMediaPlayer would fire relevant update events and Tutorial3 would handle the UI updates. For simplicity & cleaner code in this tutorial however, StreamingMediaPlayer will be directly updating the UI.
Tutorial3 then calls StreamingMediaPlayer.startStreaming():
audioStreamer.startStreaming(“http://www.pocketjourney.com/audio.mp3″,1444, 180);
Three variables are passed to startStreaming(): a url for the media to stream (link to an .mp3 file in this tutorial), the length in kilobytes of the media file, and the lenght in seconds of the media file. These last two values will be used when updating the progress bar.
AudioStreamer.startStreaming() creates a new thread for streaming the content so we can immediately return control back to the user interface.
public void startStreaming(final String mediaUrl, long mediaLengthInKb, long mediaLengthInSeconds) throws IOException {
this.mediaLengthInKb = mediaLengthInKb;
this.mediaLengthInSeconds = mediaLengthInSeconds;
this.mediaLengthInSeconds = mediaLengthInSeconds;
Runnable r = new Runnable() {
public void run() {
try {
downloadAudioIncrement(mediaUrl);
} catch (IOException e) {
Log.e(getClass().getName(), “Initialization error for fileUrl=” + mediaUrl, e);
return;
return;
}
}
};
new Thread(r).start();
new Thread(r).start();
}
Incremental Media Download
This is where the magic happens as we download media content from the the url stream until we have enough content buffered to start the MediaPlayer. We then let the MediaPlayer play in the background while we download the remaining audio. If the MediaPlayer reaches the end of the buffered audio, then we transfer any newly downloaded audio to the MediaPlayer and let it start playing again.
Things get a little tricky here because:
(a) The MediaPlayer seems to lock the file so we can’t simply append our content to the existing file.
(b) Pausing the MediaPlayer to load the new content takes awhile so we only want to interrupt it when absolutely necessary.
(c) Accessing the MediaPlayer from a separate thread causes it to crash.
(b) Pausing the MediaPlayer to load the new content takes awhile so we only want to interrupt it when absolutely necessary.
(c) Accessing the MediaPlayer from a separate thread causes it to crash.
So with those caveats in mind, here’s the method that bufferes the media content to a temporary file:
public void downloadAudioIncrement(String mediaUrl) throws IOException {
// First establish connection to the media provider
URLConnection cn = new URL(mediaUrl).openConnection();
cn.connect();
InputStream stream = cn.getInputStream();
if (stream == null) {
URLConnection cn = new URL(mediaUrl).openConnection();
cn.connect();
InputStream stream = cn.getInputStream();
if (stream == null) {
Log.e(getClass().getName(), “Unable to create InputStream for mediaUrl:” + mediaUrl);
}
// Create the temporary file for buffering data into
downloadingMediaFile = File.createTempFile(“downloadingMedia”, “.dat”);
FileOutputStream out = new FileOutputStream(downloadingMediaFile);
downloadingMediaFile = File.createTempFile(“downloadingMedia”, “.dat”);
FileOutputStream out = new FileOutputStream(downloadingMediaFile);
// Start reading data from the URL streambyte buf[] = new byte[16384];
int totalBytesRead = 0, incrementalBytesRead = 0;
do {
int totalBytesRead = 0, incrementalBytesRead = 0;
do {
int numread = stream.read(buf);
if (numread <= 0) {
if (numread <= 0) {
// Nothing left to read so quit
break;
break;
} else {
out.write(buf, 0, numread);
totalBytesRead += numread;
incrementalBytesRead += numread;
totalKbRead = totalBytesRead/1000;
totalBytesRead += numread;
incrementalBytesRead += numread;
totalKbRead = totalBytesRead/1000;
// Test whether we need to transfer buffered data to the MediaPlayer
testMediaBuffer();
// Update the status for ProgressBar and TextFieldsfireDataLoadUpdate();
testMediaBuffer();
// Update the status for ProgressBar and TextFieldsfireDataLoadUpdate();
}
} while (true);
// Lastly transfer fully loaded audio to the MediaPlayer and close the InputStream
fireDataFullyLoaded();
stream.close();
fireDataFullyLoaded();
stream.close();
}
What’s up with testMediaBuffer()?
So if you were paying attention, an important piece of functionality must reside in the testMediaBuffer() method. You’re right. That’s the method where we determine whether we need to transfer buffered data to the MediaPlayer because we have enough to start the MediaPlayer or because the MediaPlayer has already played out its previous buffer content.
Before we jump into that, please take note that interacting with a MediaPlayer on non-main UI thread can cause crashes so we always ensure we are interacting with the UI on the main-UI Thread by using a Handler when necessary. For example, we must do so in the following method because it is being called by the media streaming Thread.
private void testMediaBuffer() {
// We’ll place our following code into a Runnable so the Handler can call it for running
// on the main UI thread
Runnable updater = new Runnable() {
// on the main UI thread
Runnable updater = new Runnable() {
public void run() {
if (mediaPlayer == null) {
// The MediaPlayer has not yet been created so see if we have
// the minimum buffered data yet.
// For our purposes, we take the minimum buffered requirement to be:
// INTIAL_KB_BUFFER = 96*10/8;//assume 96kbps*10secs/8bits per byte
if ( totalKbRead >= INTIAL_KB_BUFFER) {
// the minimum buffered data yet.
// For our purposes, we take the minimum buffered requirement to be:
// INTIAL_KB_BUFFER = 96*10/8;//assume 96kbps*10secs/8bits per byte
if ( totalKbRead >= INTIAL_KB_BUFFER) {
try {
// We have enough buffered content so start the MediaPlayer
startMediaPlayer(bufferedFile);
startMediaPlayer(bufferedFile);
} catch (Exception e) {
Log.e(getClass().getName(), “Error copying buffered conent.”, e);
}
}
} else if ( mediaPlayer.getDuration() – mediaPlayer.getCurrentPosition() <= 1000 ){
// The MediaPlayer has been started and has reached the end of its buffered
// content. We test for < 1second of data (i.e. 1000ms) because the media
// player will often stop when there are still a few milliseconds of data left to play
transferBufferToMediaPlayer();
// content. We test for < 1second of data (i.e. 1000ms) because the media
// player will often stop when there are still a few milliseconds of data left to play
transferBufferToMediaPlayer();
}
}
};
handler.post(updater);
handler.post(updater);
}
Starting the MediaPlayer with Initial Content Buffer
Starting the MediaPlayer is very straightforward now. We simply copy all the currently buffered content
into a new Ffile and start the MediaPlayer with it.
into a new Ffile and start the MediaPlayer with it.
private void startMediaPlayer(File bufferedFile) {
try {
File bufferedFile = File.createTempFile(“playingMedia”, “.dat”);
FileUtils.copyFile(downloadingMediaFile,bufferedFile);} catch (IOException e) {
FileUtils.copyFile(downloadingMediaFile,bufferedFile);} catch (IOException e) {
mediaPlayer = new MediaPlayer();
mediaPlayer.setDataSource(bufferedFile.getAbsolutePath());
mediaPlayer.prepare();
fireDataPreloadComplete();
mediaPlayer.setDataSource(bufferedFile.getAbsolutePath());
mediaPlayer.prepare();
fireDataPreloadComplete();
Log.e(getClass().getName(), “Error initializing the MediaPlaer.”, e);
return;
return;
}
}
Transferring Buffered Content to a MediaPlayer That is Already Playing
This is a little trickier but not much. We simply pause the MediaPlayer if it was playing (i.e. the user had not pressed pause), copy over the currently downloaded media content (which may be all of it by now) and then restart the MediaPlayer if it was previously running or had hit the end of its buffer due to a slow network.
private void transferBufferToMediaPlayer() {
try {
// Determine if we need to restart the player after transferring data (e.g. perhaps the user
// pressed pause) & also store the current audio position so we can reset it later.
boolean wasPlaying = mediaPlayer.isPlaying();
int curPosition = mediaPlayer.getCurrentPosition();
mediaPlayer.pause();
// pressed pause) & also store the current audio position so we can reset it later.
boolean wasPlaying = mediaPlayer.isPlaying();
int curPosition = mediaPlayer.getCurrentPosition();
mediaPlayer.pause();
// Copy the current buffer file as we can’t download content into the same file that
// the MediaPlayer is reading from.
File bufferedFile = File.createTempFile(“playingMedia”, “.dat”);
FileUtils.copyFile(downloadingMediaFile,bufferedFile);
// the MediaPlayer is reading from.
File bufferedFile = File.createTempFile(“playingMedia”, “.dat”);
FileUtils.copyFile(downloadingMediaFile,bufferedFile);
// Create a new MediaPlayer. We’ve tried reusing them but that seems to result in
// more system crashes than simply creating new ones.
mediaPlayer = new MediaPlayer();
mediaPlayer.setDataSource(bufferedFile.getAbsolutePath());
mediaPlayer.prepare();
mediaPlayer.seekTo(curPosition);
// more system crashes than simply creating new ones.
mediaPlayer = new MediaPlayer();
mediaPlayer.setDataSource(bufferedFile.getAbsolutePath());
mediaPlayer.prepare();
mediaPlayer.seekTo(curPosition);
// Restart if at end of prior beuffered content or mediaPlayer was previously playing.
// NOTE: We test for < 1second of data because the media player can stop when there is still
// a few milliseconds of data left to play
boolean atEndOfFile = mediaPlayer.getDuration() – mediaPlayer.getCurrentPosition() <= 1000;
if (wasPlaying || atEndOfFile){
// NOTE: We test for < 1second of data because the media player can stop when there is still
// a few milliseconds of data left to play
boolean atEndOfFile = mediaPlayer.getDuration() – mediaPlayer.getCurrentPosition() <= 1000;
if (wasPlaying || atEndOfFile){
mediaPlayer.start();
}
}catch (Exception e) {
Log.e(getClass().getName(), “Error updating to newly loaded content.”, e);
}
}
Conclusion
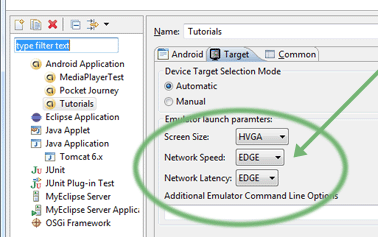
To get the real feel for how your audio will download, make sure to set it to a slower network speed. I recommend setting to AT&T’s EDGE network setting as it should give a lower limit on expected performance. You can make these setting’s easy in Eclipse by setting going into your Run or Debug setting’s dialog and making these selections.
Well that’s it. I’ve inluded additional code for handling the ProgressBar and TextField updates but that should all be sufficiently easy to understand once you understand the rest of the code. Good luck during the next week as you finish your Android Challenge submissions.
And of course, here’s the source code. Please post a comment below if I need to explain anything in more detail. You’ll also notice code for the other tutorials as I didn’t have time to strip them out.
Thanks
akm
www.cdacians.com
No comments:
Post a Comment